
Fandom-k 프로젝트 회고1
Updated:
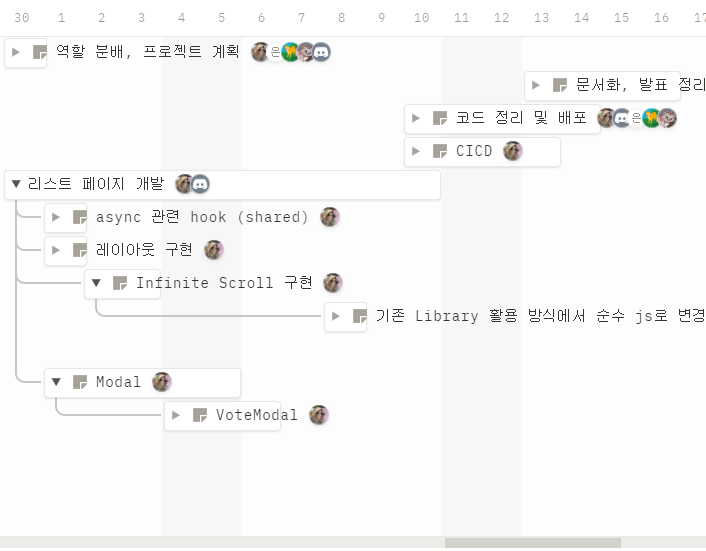
팀 프로젝트 세팅
역할
공통 컴포넌트 제작: infinite scroll, Button 같은 간단한 UI
목록 페이지 widget 제작: 투표 리스트 관련 Skeleton,
CICD : Netlify와 GithubAction을 통해서 PR event에 반응하여 자동 배포하는 로직 구현
기간별 업무
폴더 구조
기존에 사용하던 FSD 구조는 다른 팀원들도 완벽하게 알아야만 효과적인 구조이기 때문에 팀원들과의 회의 끝에 조금 변형되어 사용되었습니다.
📦src
    ├── 📂main.jsx
    ├── 📂main.scss
    ├── 📂app/
    │   ├── 📜index.js
    │   ├── 📜index.scss
    │   └── 📂pages/
    │       ├── 📂MyPage/
    │       │   ├── 📜index.jsx
    │       │   └── 📂widgets/
    │       │       ├── 📂<이름>/
    │       │       │   ├── 📜index.jsx
    │       │       │   └── 📜index.scss
    │       │       └── ...
    │       ├── 📂ListPage/
    │       │   ├── 📜index.jsx
    │       │   └── 📂widgets/
    │       │       ├── 📂<이름>/
    │       │       │   ├── 📜index.jsx
    │       │       │   └── 📜index.scss
    │       │       └── ...
    │       └── 📂LandingPage/
    │           ├── 📜index.jsx
    │           └── 📂widgets/
    │               ├── 📂<이름>/
    │               │   ├── 📜index.jsx
    │               │   └── 📜index.scss
    │               └── ...
    └── 📂common/
        ├── 📂api/
        │   └── 📜index.js
        ├── 📂assets/
        │   ├── 📂icons/
        │   │   ├── 📜<이름.jsx>
        │   │   └── ...
        │   └── 📂images/
        │       ├── 📜<이름.png>
        │       ├── 📜<이름.jpg>
        │       └── ...
        ├── 📂hooks/
        │   ├── 📜<이름.js>
        │   └── ...
        ├── 📂models/
        │   ├── 📜<이름.js>
        │   └── ...
        ├── 📂utilities/
        │   ├── 📜<이름.js>
        │   └── ...
        └── 📂widgets/
            ├── 📂<이름>/
            │   ├── 📜index.jsx
            │   └── 📜index.scss
            └── ...
UX 향상을 위한 기능 구현
infinite scroll
개념
interception observer API라는 요소가 프레임 안에 보여지는 것을 감지하는 API를 이용해서 스크롤이 내려가서 요소가 보이면 그때 fetch를 요청하여 UX를 향상하는 기술이다.
처음에 데이터 관련 fetch 요청을 전부 보내서 화면을 구성하게 되면 불필요한 시간을 보내게 되서 렌더링 자체가 느려지기 때문에 목록 페이지 같은 많은 데이터를 받아야 하는 페이지에서는 꼭 필요한 기능이다.
useInView
const rootRef = useRef(null);
const { ref, inView, entry } = useInView({
		threshold: 1,
		root: rootRef.current,
	});

	useEffect(() => {
		if (inView) setMoreItems((prevMoreItems) => prevMoreItems + 5);
	}, [inView]);

  return <ChartList $numbers={numberOfItem} ref={rootRef}>
                  {status.isLoading ? (
                      <div>로딩화면</div>
                  ) : (
                      <>
                          {sortedItems?.map((item, index) => (
                              <IdolChartCard key={item.id} item={item} index={index} />
                          ))}
                          {noMoreItem && (
                              <RefreshSection ref={ref}>
                                  <div>{inView}</div>
                                  <RefreshImg src={refresh} />
                              </RefreshSection>
                          )}
                      </>
                  )}
              </ChartList>
useInView 라이브러리는 먼저 rootRef로 찍힌 element를 root(프레임의 기준이 되는 요소) 옵션에 넣어서 root임을 표시한 후
threshold로 보여지는 비율(프레임 내에서 보여지는 비율)을 지정한다.
useInView의 ref가 threshold만큼 root에서 보여지면 inView가 true로 변하고 아니면 false로 변한다.
fetch와 연결하여 infinite scroll 구현
export default function useInfiniteScroll(fetchFunction, options) {
	const rootRef = useRef(null);
	const [items, setItems] = useState([]);
	const [cursor, setCursor] = useState(0);
	const [status, wrappedFunction] = useGetData(fetchFunction);
	const { ref, inView } = useInView({
		threshold: 0,
		root: rootRef.current,
	});
	async function executeRefresh() {
		const { idols, nextCursor } = await wrappedFunction({
			...options,
			cursor,
		});
		if (!idols) return;
		setCursor(nextCursor);
		setItems([...items, ...idols]);
	}

	useEffect(() => {
		if (inView && cursor !== null && cursor !== 0) {
			executeRefresh();
		} else if (items.length === 0) {
			executeRefresh();
		}
	}, [inView]);

	return { items, ref, status, rootRef };
}
cursor를 기반으로 10개씩 데이터를 받아오게 되어 있다. ref, rootRef를 prop으로 내렸기 때문에 infinitescroll을 사용할 때 ref, rootRef만 지정하면 useInview의 로직을 몰라도 사용할 수 있게 만들었다.
useEffect로 inView를 감지하여 내부적으로 state를 통해 데이터가 관리된다.
Trouble Shooting
1. Event Bubbling으로 인해서 특정 부분 자식요소 클릭시 부모 요소를 클릭하지 않았던 문제
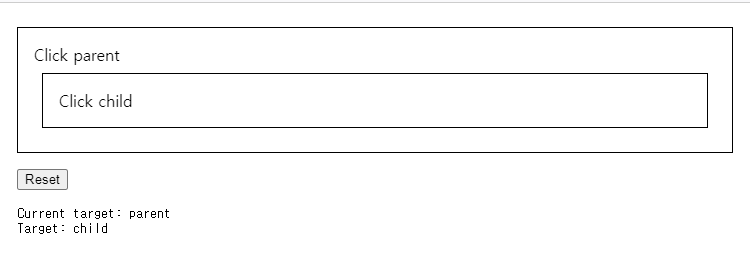
Event가 요소가 처음 발생한 target을 찍으려면 currentTarget이라는 Event Property를 사용해서 해결하였다.
2. interception observer 사용시 웹 브라우저 확대 문제
브라우저 확대시 threshold가 화면과 다르게 설정되기 때문에 100%로 맞춰놓고 해야 interception observer가 작동한다.
3. inView가 두번 처리되던 문제
inView 자체를 useEffect의 deps에 넣고 사용하면 inView가 두번 처리되게 된다.
inView가 true > false일 때도 작동하고 false > true일 때도 작동하게 된다.
infinite scroll을 생각해보면 inView가 보일때 true, 다음 데이터를 로딩할 때 false이기 때문에 두번 작동하는게 당연하다.
이를 해결하기 위해서는 if (inView)같은 조건을 useEffect 내에 달아서 한번만 작동되게 바꾸면 된다.
결과
skeleton
개념
유튜브 홈화면에서 흔하게 볼 수 있는 UX를 향상하는 방법인데 데이터가 불러오기 전에 화면의 윤곽을 먼저 그려줘서 사용자의 이탈을 막는 기능이다.
목록 페이지에는 infinite scroll로 받아오는 데이터가 많은데 이때 이를 단순한 로딩 아이콘으로 처리하면 UX가 좋지 않을 것이다.
구현
styled-components의 css를 쓰면 css 파일 자체를 css그 자체로 상속할 수 있다.
// css
import { css } from "styled-components";
import { skeleton } from "./keyframes";

export default css`
  background-color: #363636;
  position: relative;
  overflow: hidden;
  z-index: 1;
  &:after {
    content: " ";
    display: block;
    position: absolute;
    left: 0;
    right: 0;
    height: 100%;
    background-repeat: no-repeat;
    background-image: linear-gradient(
      90deg,
      rgba(54, 54, 54, 1) 20%,
      rgba(144, 144, 144, 1) 50%,
      rgba(54, 54, 54, 1) 80%
    );
    transform: translateX(-100%);
    animation-name: ${skeleton};
    animation-duration: 1.5s;
    animation-iteration-count: infinite;
    animation-timing-function: ease-in-out;
    animation-direction: normal;
  }
`;
// ...
// keyframe
export const skeleton = keyframes`
  100% {
    transform: translateX(100%);
  }
`;
위 코드처럼 스켈레톤에 기본 css를 작성한다.
styled-components의 keyframes을 사용해서 애니메이션을 제작한 후에 이를 css에 붙힌 후 옵션을 통해 1.5초 무한으로 반복되는 linear-gradient를 만들었다.
const SkeletonNameBlock = styled.div`
  width: 120px;
  height: 15px;
  border-radius: 10px;
  ${skeletonStyle};
`;
데이터가 들어가는 요소와 비슷한 요소에 해당 애니메이션을 넣어주고 이를 infinite scroll과 연결하여 데이터를 받아오는 동안에는 스켈레톤 이미지가 대신 보이도록 구현해준다.
export default function MonthChartList({ gender, isactive }) {
  const { items, ref, status, rootRef } = useInfiniteScroll(getCharts, {
    gender,
  });

  return (
    <ChartList
      ref={rootRef}
      style=
    >
      {items?.map((item, index) => (
        <IdolChartCard key={item.id} item={item} index={index} ref={ref} />
      ))}
      {status.isLoading &&
        Array.from(Array(10)).map((_, index) => (
          <IdolChartCardSkeleton key={index} />
        ))}
    </ChartList>
  );
}
결과
Trouble Shooting
- (styled component) className이 직접 들어가지 않아서 적용되지 않았던 문제
styled component가 적용되기 위해서는 해당 HTMLElement에 직접 className이 있어야 한다.
export function Heading({ children,className}) {
  return (
        <HeadingContainer className={className}>{children}</HeadingContainer>
  );
}
이 상태면 HeadingContainer에 className은 styled componenet가 이미 만들었기 때문에 prop으로 받은 className이 해당 component로 내려가지 않아서 그것에 적용된 스타일링도 적용되지 않게 된다.
export function Heading({ children,className}) {
  return (
    <div className={className}>
      <HeadingContainer>{children}</HeadingContainer>
    </div>
  );
}
이런식으로 className을 전달 받는 하나의 Element가 있어야 스타일링이 그대로 적용되게 된다.
터미널, git관련 문제
**Terminal**WSL을 vscode에서 사용하는 방식은 remote로 찍는 것이다.
왼쪽 아래에 버튼을 통해서 컨트롤하게 구현되어 있다.
**Git**
git squash merge를 이용하면 commit의 내용을 한 커밋으로 받을 수 있다.
이후 기존의 feature 브랜치는 삭제하고 새로운 feature를 생성해야한다.
코드잇 프로젝트 진행 중에 겪은 경험들입니다.
문제가 되는 부분이 있다고 요청 주시면 삭제하겠습니다.
감사합니다.
Leave a comment